Beranda
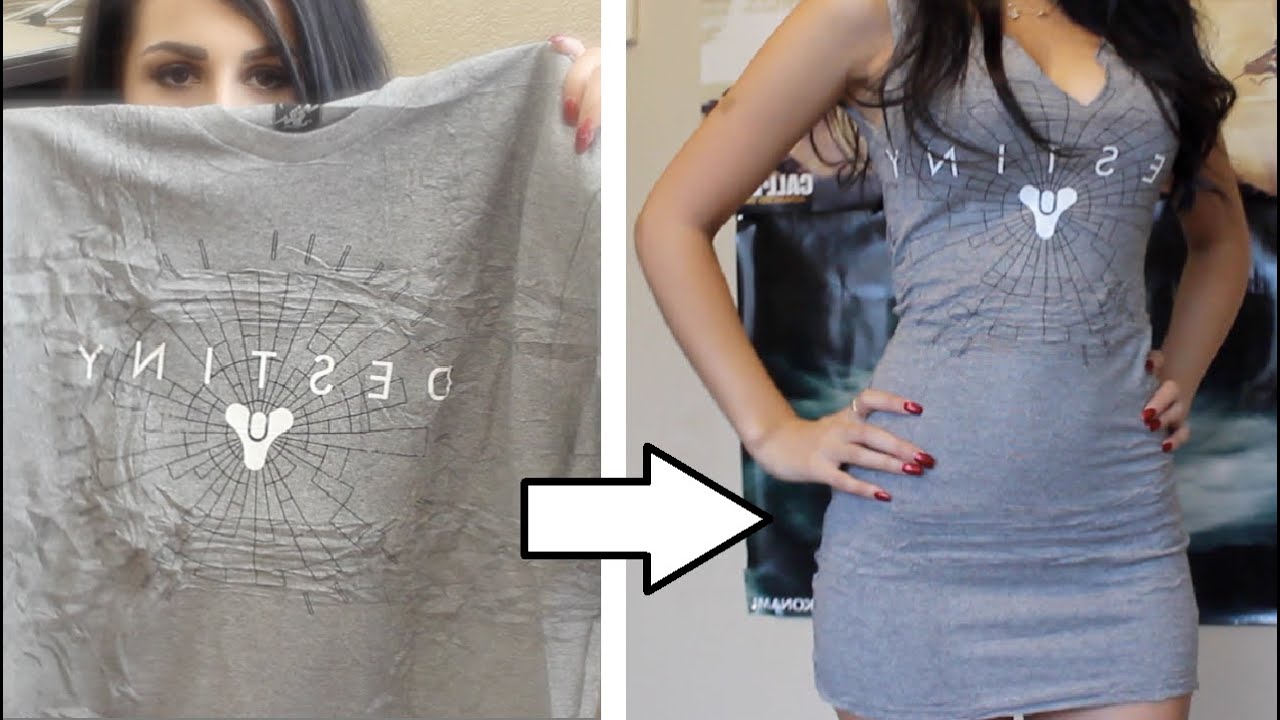
/ Diy T Shirt Dress No Sew : Diy 2 No Sew Altered Tee Shirt Tutorials From Gina True Blue Me You Diys For Creatives / Head over to wobisobi to find out how to craft your own studded lattice tee.
Diy T Shirt Dress No Sew : Diy 2 No Sew Altered Tee Shirt Tutorials From Gina True Blue Me You Diys For Creatives / Head over to wobisobi to find out how to craft your own studded lattice tee.
Insurance Gas/Electricity Loans Mortgage Attorney Lawyer Donate Conference Call Degree Credit Treatment Software Classes Recovery Trading Rehab Hosting Transfer Cord Blood Claim compensation mesothelioma mesothelioma attorney Houston car accident lawyer moreno valley can you sue a doctor for wrong diagnosis doctorate in security top online doctoral programs in business educational leadership doctoral programs online car accident doctor atlanta car accident doctor atlanta accident attorney rancho Cucamonga truck accident attorney san Antonio ONLINE BUSINESS DEGREE PROGRAMS ACCREDITED online accredited psychology degree masters degree in human resources online public administration masters degree online bitcoin merchant account bitcoin merchant services compare car insurance auto insurance troy mi seo explanation digital marketing degree floridaseo company fitness showrooms stamfordct how to work more efficiently seowordpress tips meaning of seo what is an seo what does an seo do what seo stands for best seotips google seo advice seo steps, The secure cloud-based platform for smart service delivery. Safelink is used by legal, professional and financial services to protect sensitive information, accelerate business processes and increase productivity. Use Safelink to collaborate securely with clients, colleagues and external parties. Safelink has a menu of workspace types with advanced features for dispute resolution, running deals and customised client portal creation. All data is encrypted (at rest and in transit and you retain your own encryption keys. Our titan security framework ensures your data is secure and you even have the option to choose your own data location from Channel Islands, London (UK), Dublin (EU), Australia.
Diy T Shirt Dress No Sew : Diy 2 No Sew Altered Tee Shirt Tutorials From Gina True Blue Me You Diys For Creatives / Head over to wobisobi to find out how to craft your own studded lattice tee.. Red velvet ribbon one shoulder shirt diy. Simply cut the back out of a shirt, and then attach a bow which you can tie. (1) insert straight pins into the sides of the shirt at the cut edge. Press it flat with an iron, then sew around it using a narrow zigzag stitch, ⅛ inch (0.32 centimeters) away from the inside edge. Diy ideas by adc add comment a shakuhachi lookbook became an amazing point of diy inspiration.
They are super easy and only take five minutes to complete. Simply cut the back out of a shirt, and then attach a bow which you can tie. First stare at your dress and make a plan. See more ideas about diy clothes, diy fashion, convertible clothing. Hem the dress, if desired.
Wobisobi No Sew Tee Shirt Halter 3 Diy Diy Fashion Diy Clothes Clothes from i.pinimg.com And the studs add some serious metallic style. My plan was to cut off the top of the dress, above the waistband. With the help of the tutorial shared by apairandaspare, you will be able to make this lovely dress and so not spend money on shakuhachi`s design. Use ribbon as the basis for your skirt, and tie pieces of tulle to form the skirt portion. Red velvet ribbon one shoulder shirt diy. Fortunately for you, we have a solution! Measure half the distance of your measurements (since you are only measuring one side), add at least ½ inch (1.25 cm), and mark it in chalk. Diy clothes refashion for teens, no sew /via.
You could even diy a matching one for you child!
Fortunately for you, we have a solution! See more ideas about diy clothes, diy clothing, diy fashion. See more ideas about diy clothes, diy fashion, convertible clothing. Lets see if we can get 1000 likes! First stare at your dress and make a plan. My plan was to cut off the top of the dress, above the waistband. Press it flat with an iron, then sew around it using a narrow zigzag stitch, ⅛ inch (0.32 centimeters) away from the inside edge. You could even diy a matching one for you child! Hem the dress, if desired. Cut along the neck of the shirt leaving the buttons and collar intact. How to turn a dress into a skirt without sewing. So grab a couple of tees you haven't worn in a while and i'll. ♥ i will try and upload more on this channel!
Fold the bottom hem up by ½ inch (1.27 centimeters). Insert straight pins at those two folds. ♥ i will try and upload more on this channel! Diy ideas by adc add comment a shakuhachi lookbook became an amazing point of diy inspiration. Diy braided back shirt /via.
Diy Easy Tshirt Dress Tutorial No Sew Youtube from i.ytimg.com They are super easy and only take five minutes to complete. You can go with any color or pattern fabric you want for the bow, so this is a good way to add some color and fun to an otherwise plain shirt. Simply adjust the amount of shirring to make you look great from every angle! Connect these measurements with straight lines. With the help of the tutorial shared by apairandaspare, you will be able to make this lovely dress and so not spend money on shakuhachi`s design. Diy ideas by adc add comment a shakuhachi lookbook became an amazing point of diy inspiration. Watch in 1080 for the best quality ;)heyy, if you wanna see me do anything feel free to comment down below and stay safe out here.🌱fall shein haul + lookboo. Fashion a cute dress from an oversized skirt.
Lets see if we can get 1000 likes!
And the studs add some serious metallic style. So grab a couple of tees you haven't worn in a while and i'll. See more ideas about diy clothes, diy clothing, diy fashion. Simply adjust the amount of shirring to make you look great from every angle! Watch in 1080 for the best quality ;)heyy, if you wanna see me do anything feel free to comment down below and stay safe out here.🌱fall shein haul + lookboo. Red velvet ribbon one shoulder shirt diy. Insert straight pins at those two folds. Fold the bottom hem up by ½ inch (1.27 centimeters). They are super easy and only take five minutes to complete. ♥ i will try and upload more on this channel! Head over to wobisobi to find out how to craft your own studded lattice tee. Diy braided back shirt /via. (1) insert straight pins into the sides of the shirt at the cut edge.
Diy ideas by adc add comment a shakuhachi lookbook became an amazing point of diy inspiration. So grab a couple of tees you haven't worn in a while and i'll. See more ideas about diy clothes, diy clothing, diy fashion. ♥ i will try and upload more on this channel! Press it flat with an iron, then sew around it using a narrow zigzag stitch, ⅛ inch (0.32 centimeters) away from the inside edge.
No Sew Toddler T Shirt Dress Online from i.pinimg.com Diy ideas by adc add comment a shakuhachi lookbook became an amazing point of diy inspiration. Measure half the distance of your measurements (since you are only measuring one side), add at least ½ inch (1.25 cm), and mark it in chalk. Fashion a cute dress from an oversized skirt. Simply adjust the amount of shirring to make you look great from every angle! Connect these measurements with straight lines. The twist front detail is fun to do and also. You can go with any color or pattern fabric you want for the bow, so this is a good way to add some color and fun to an otherwise plain shirt. You can make a diy tutu for the doll, and you can have your kids help you make a matching one for themselves!
First stare at your dress and make a plan.
And the studs add some serious metallic style. Easy diy lace sleeve tank top. Simply adjust the amount of shirring to make you look great from every angle! They are super easy and only take five minutes to complete. How to turn a dress into a skirt without sewing. Diy clothes refashion for teens, no sew /via. Fortunately for you, we have a solution! Your shirt is now divided into four equal sections. Hope you guys enjoy this video! Lets see if we can get 1000 likes! You could even diy a matching one for you child! My dress has an elastic waistband, sealed in a casing. With the help of the tutorial shared by apairandaspare, you will be able to make this lovely dress and so not spend money on shakuhachi`s design.
See more ideas about diy clothes, diy fashion, convertible clothing diy t shirt dress. Measure half the distance of your measurements (since you are only measuring one side), add at least ½ inch (1.25 cm), and mark it in chalk.